Common Guides
GUI
Canvas scaler, prefabs, sprites, TextMeshPro and customization tips for LayerLab GUI packs.
1. Key Points
- The assets are optimized for mobile platforms.
- Each asset has its own set of supported elements and files.
- Differences Between GUI Pro Pack and GUI Pack
2. DemoScene
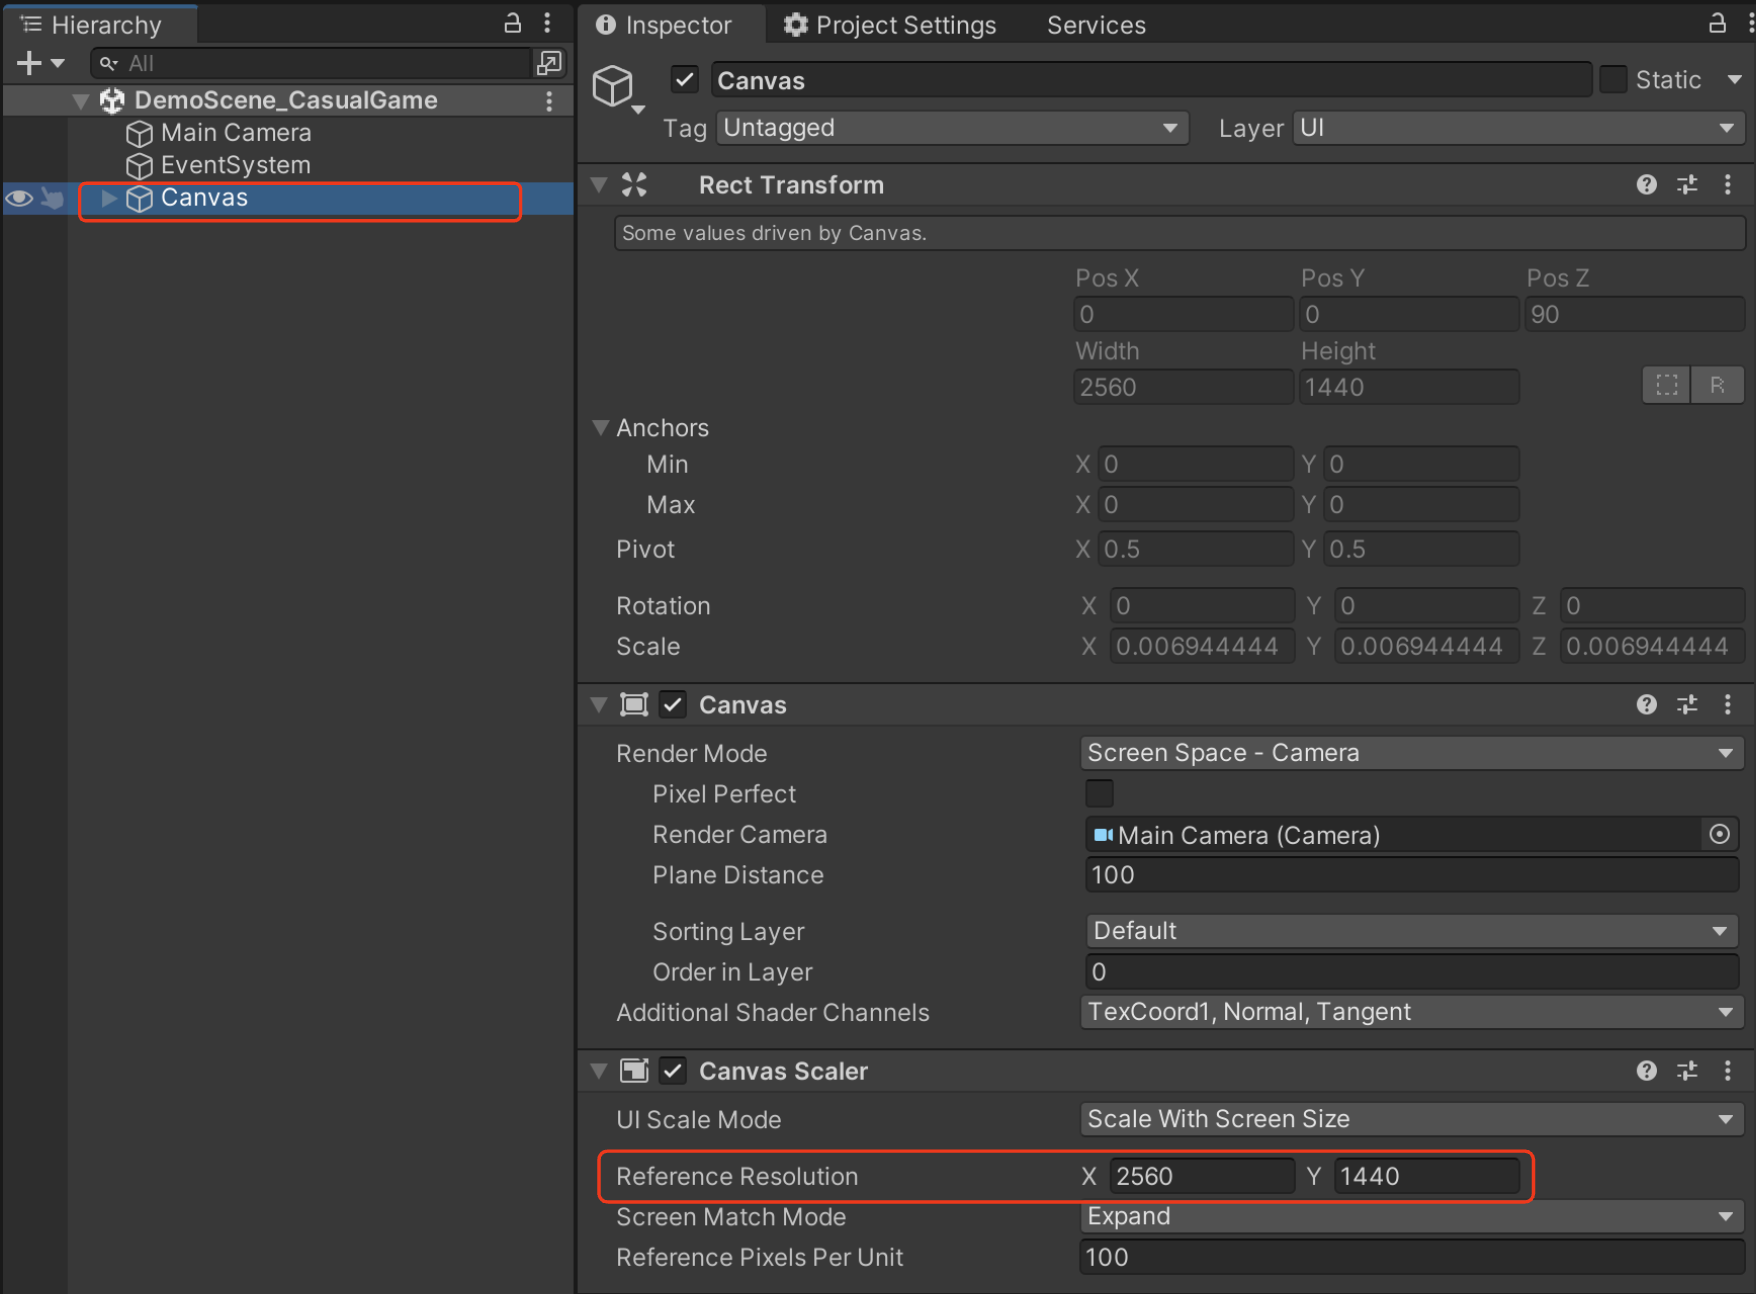
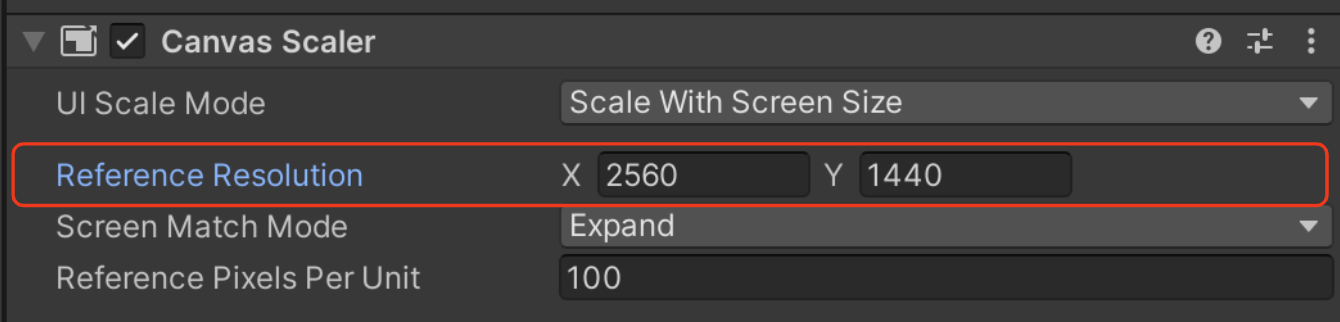
2-1. Canvas Scaler Resolution
- The resolution of the demo scenes is designed and configured differently for each GUI pack.
- You can view the resolution in the Canvas Scaler component in the Inspector after selecting the Canvas object in the Hierarchy window.
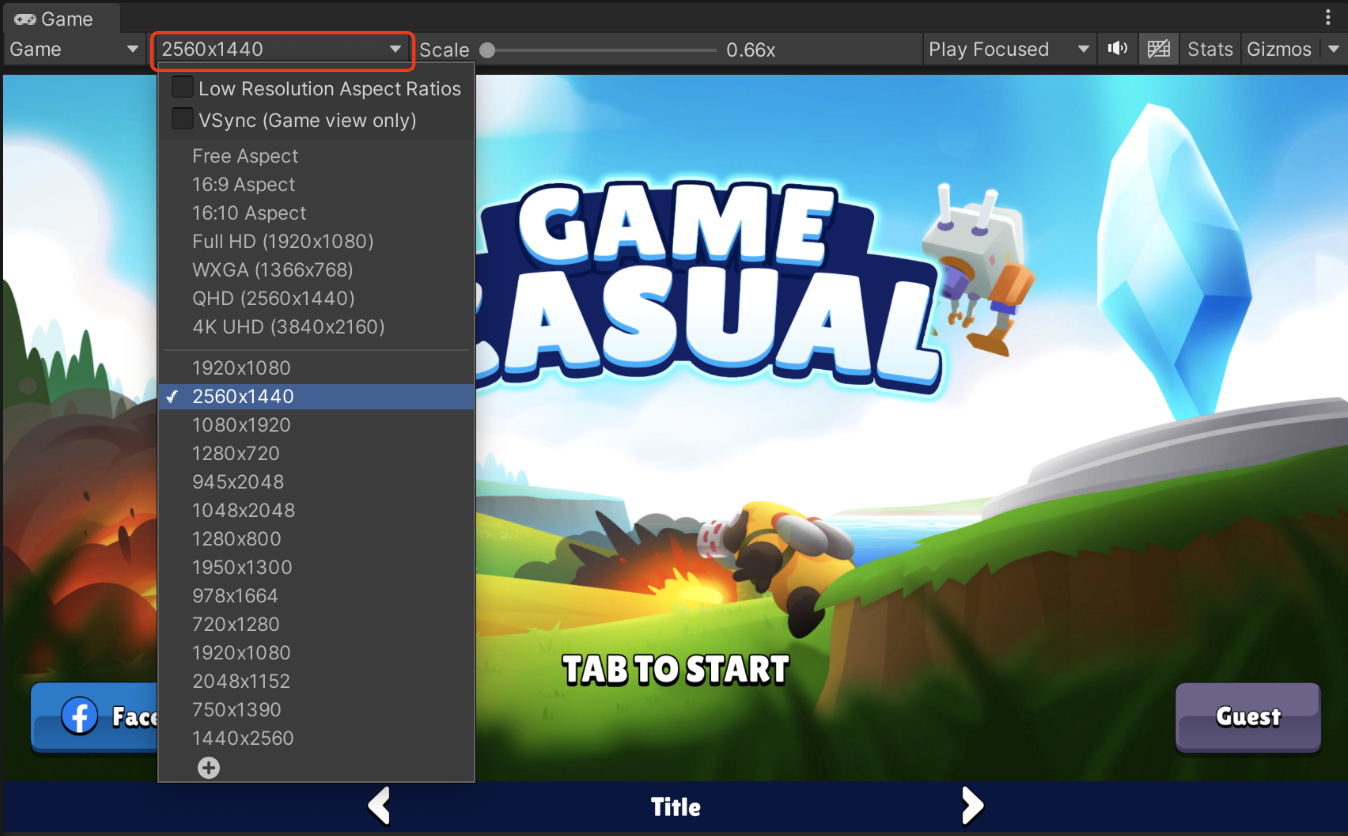
2-2. Game View Resolution Settings
1. Check the Canvas Scaler size set in the demo scene for each asset.
1. In the Unity Editor's Game view, adjust the resolution settings to match exactly with the Canvas Scaler resolution used in the demo scene.
The demo scenes are set to specific resolutions, so you can preview them using these settings.
When implementing in your own project, you should configure the resolution and canvas scaler settings to suit your specific needs and target devices.
reference video
*[video omitted: %E1%84%92%E1%85%AA%E1%84%86%E1%85%A7%E1%86%AB_%E1%84%80%E1%85%B5%E1%84%85%E1%85%A9%E1%86%A8_2024-10-31_%E1%84%8B%E1%85%A9%E1%84%92%E1%85%AE_8.24.57.mov]*
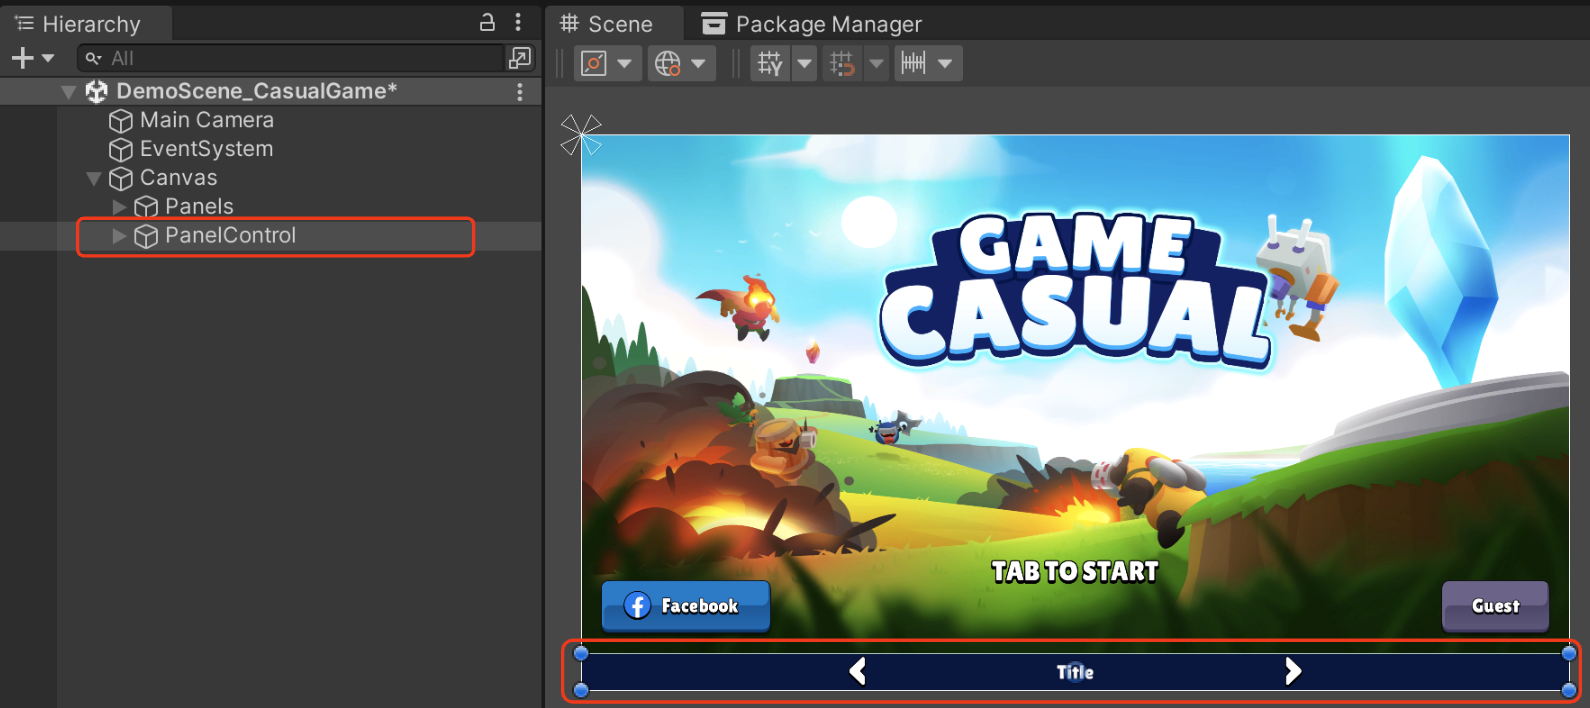
2-3. Panel Control
- The Panel Control in the demo scene can be toggled on and off for user convenience.
- By utilizing the Panel Control, users can quickly navigate through sample scenes in the Game window's play mode.
reference video
*[video omitted: %E1%84%92%E1%85%AA%E1%84%86%E1%85%A7%E1%86%AB_%E1%84%80%E1%85%B5%E1%84%85%E1%85%A9%E1%86%A8_2024-10-31_%E1%84%8B%E1%85%A9%E1%84%92%E1%85%AE_8.07.57.mov]*
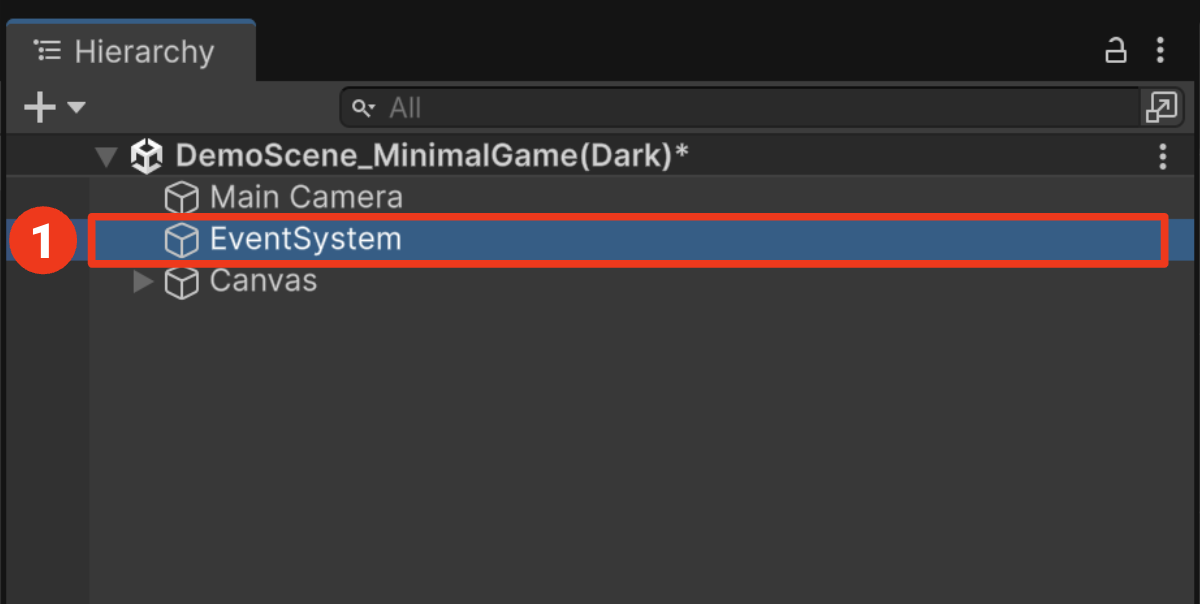
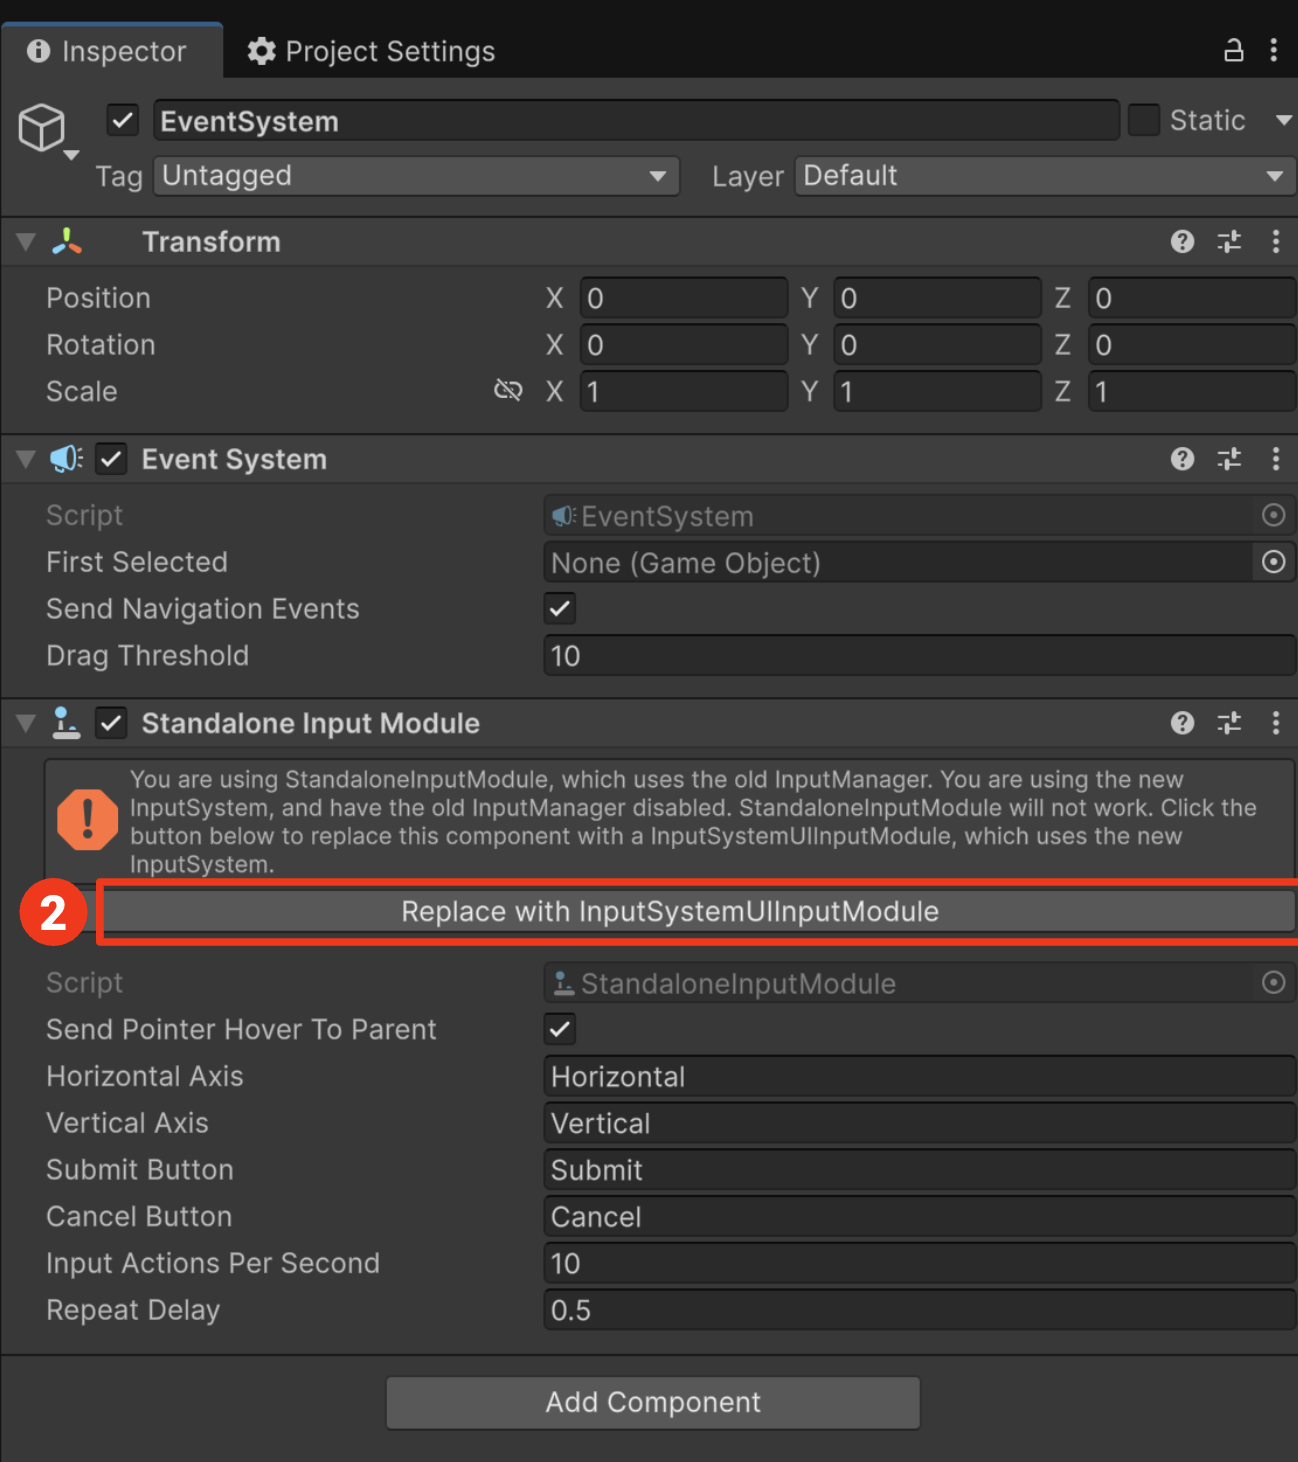
2-4. Unity 6.3 Input System Setup
In the scene, here's how to replace the legacy StandaloneInputModule with InputSystemUIInputModule to resolve the Input System conflict in Unity 6.3.
- Click EventSystem in the Hierarchy > Click "Replace with InputSystemUIInputModule" in the Inspector.

3. Prefabs
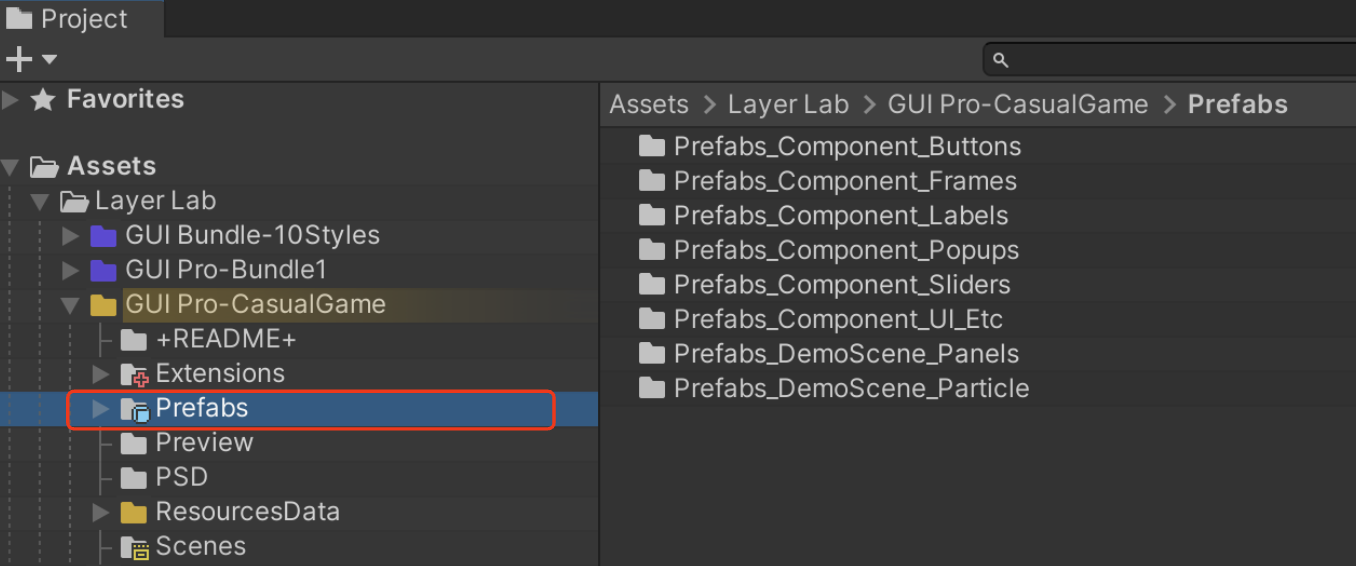
3-1. Prefab Location
- All UI elements in the demo scene have been created as separate prefabs and are located in the Prefabs folder.
3-2. Prefab Preview
- To easily view all UI prefabs at once, double-click on the prefab catalog files named in the "_PrefabsPanel_xx" format.
- If you want to view UI prefabs individually, simply double-click on each UI prefab. This will allow you to see the corresponding prefab in the scene.
- If the object does not appear in the scene after double-clicking, press the shortcut key 'F' to focus on it.

reference video
*[video omitted: %E1%84%92%E1%85%AA%E1%84%86%E1%85%A7%E1%86%AB_%E1%84%80%E1%85%B5%E1%84%85%E1%85%A9%E1%86%A8_2024-11-04_%E1%84%8B%E1%85%A9%E1%84%92%E1%85%AE_12.17.06.mov]*
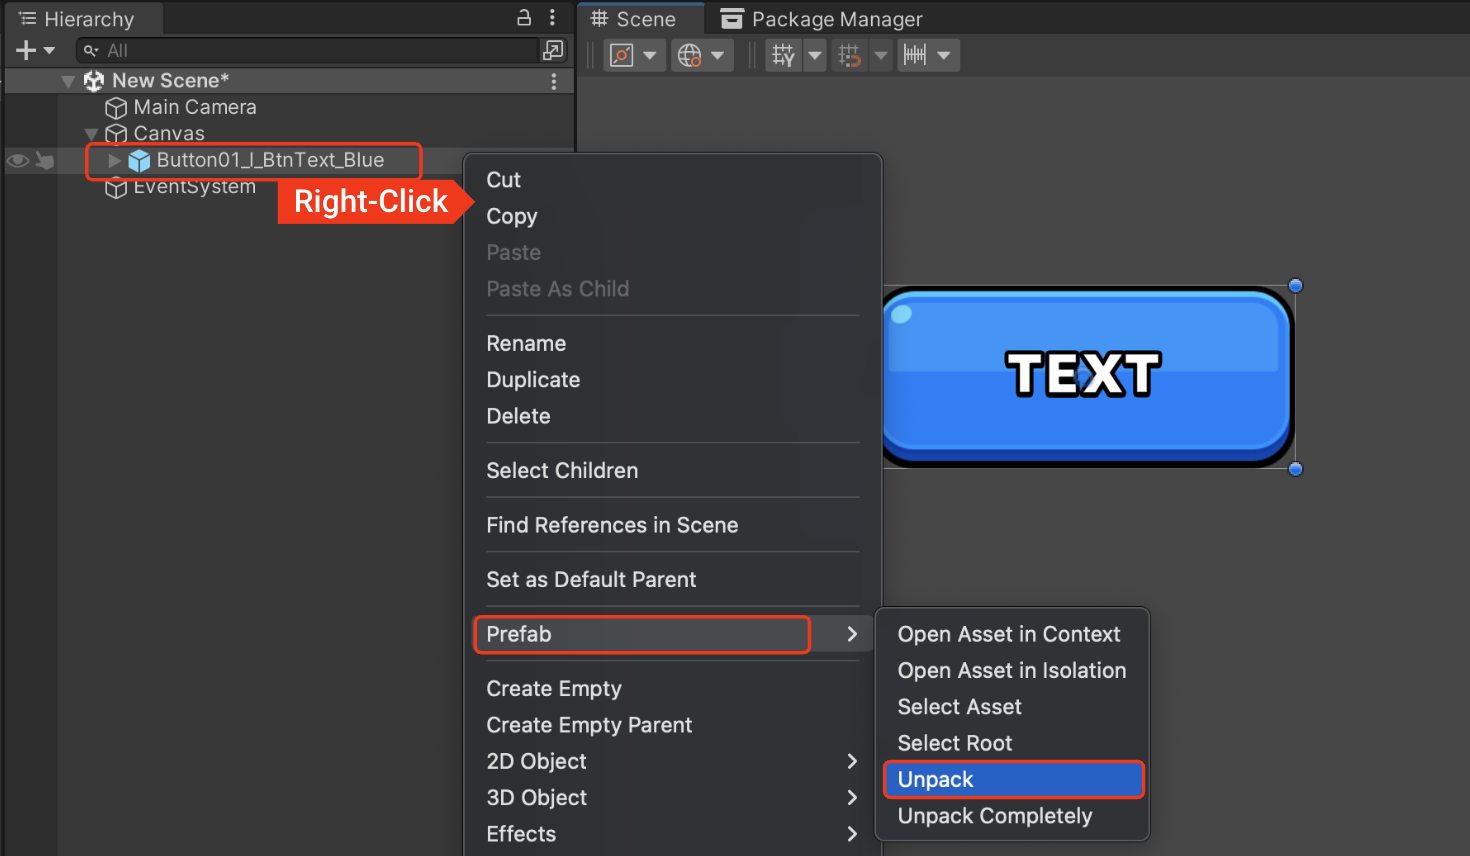
3-3. How to use Prefabs
1. ‘Drag and drop’ the prefab onto the canvas in the hierarchy window.
Prefabs need to be located as child objects under the Canvas.
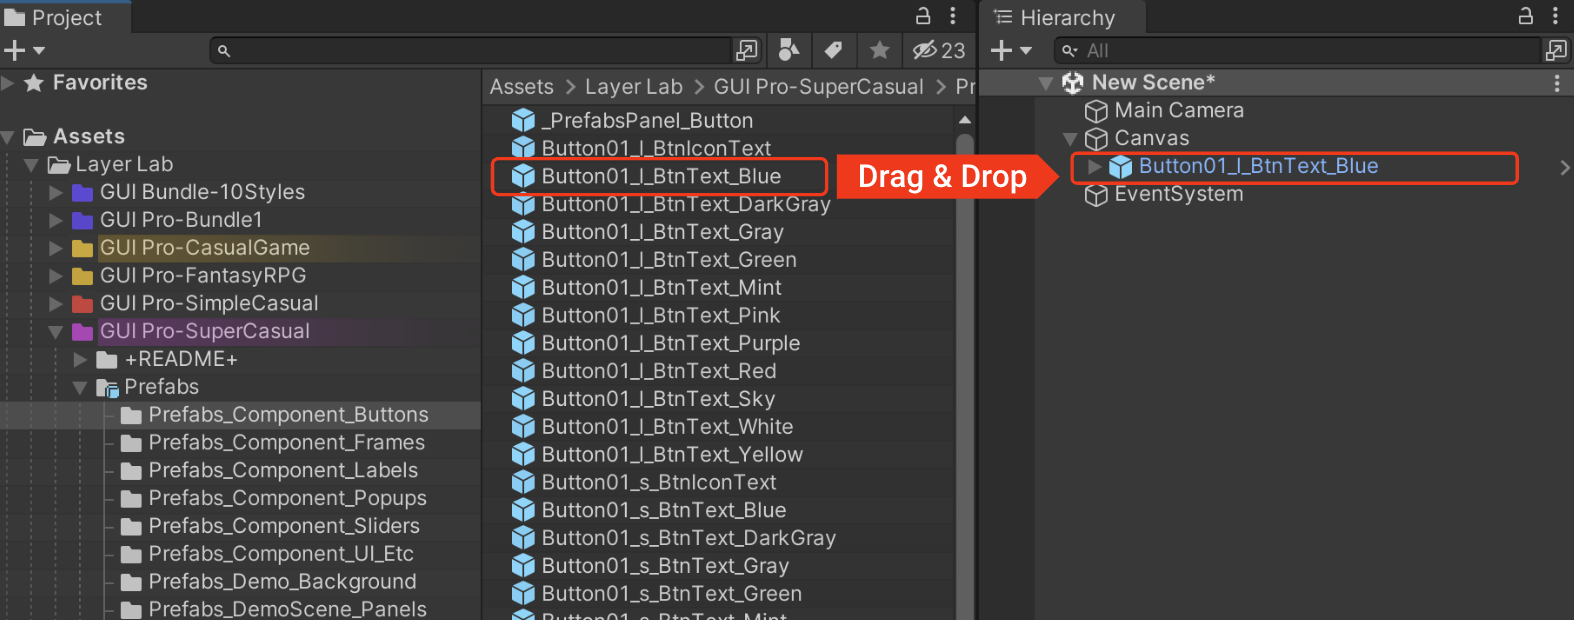
1. Right-click on the object you imported via drag and drop and select 'Prefab -> Unpack'.
1. Modify the UI to suit your project.
By following this process, you ensure that any changes you make in your project do not affect the original prefab asset.
reference video
*[video omitted: %E1%84%92%E1%85%AA%E1%84%86%E1%85%A7%E1%86%AB_%E1%84%80%E1%85%B5%E1%84%85%E1%85%A9%E1%86%A8_2024-11-04_%E1%84%8B%E1%85%A9%E1%84%92%E1%85%AE_4.41.20.mov]*
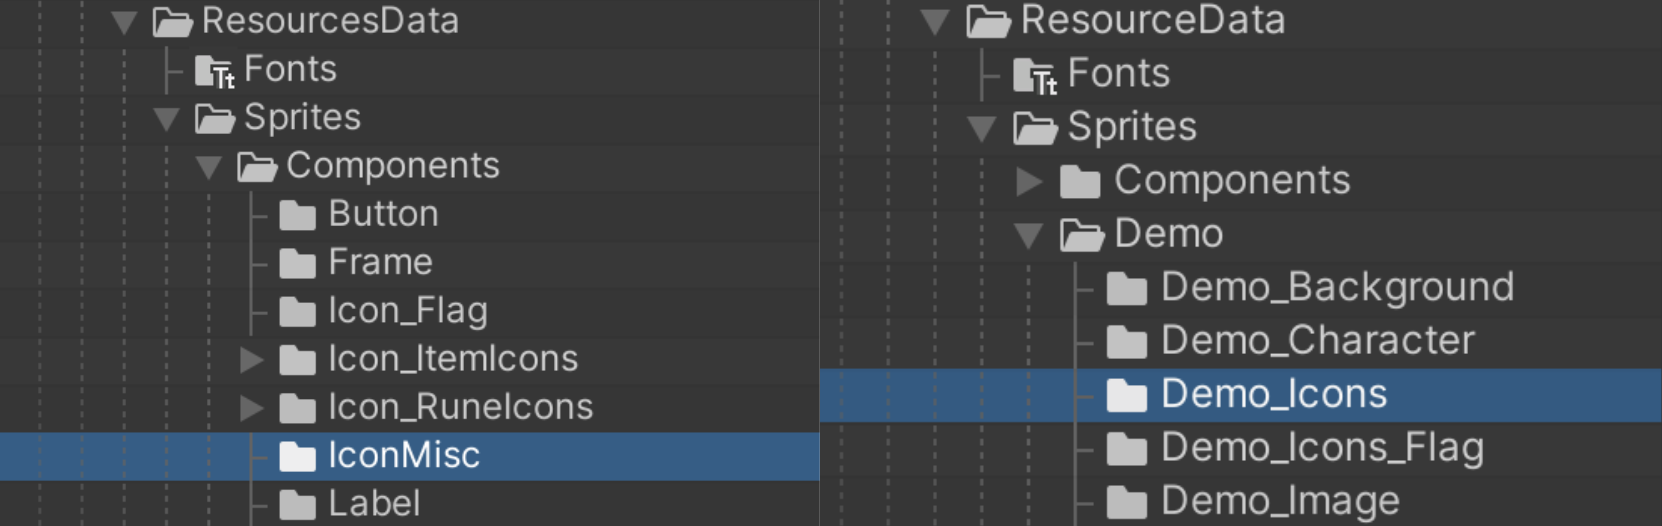
4. Sprites
4-1. Basic Information
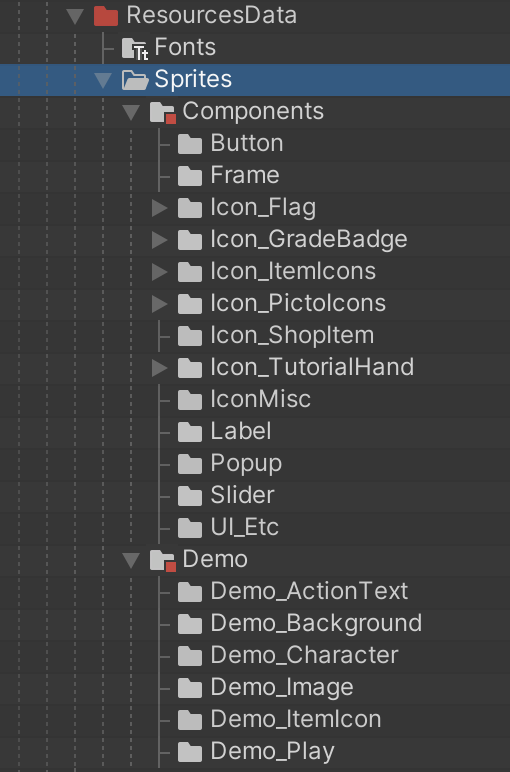
- All PNG images are located within the Sprites folder.
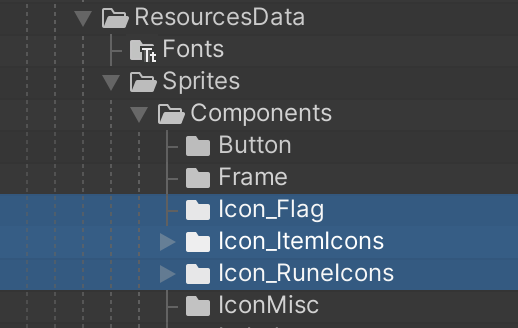
4-2. Core Icons
- Core icon sets are provided in multiple sizes.
- The types, number, and sizes of core icons vary for each asset and can be previewed in the asset overview.

- Core icons are located in ‘ResourcesData/Sprites/Components/’.
4-3. Demo Icons & Other Icons
- Icons used as samples in demo scenes are provided in predetermined sizes.
- These sizes are designed for demo scene layouts, having fixed dimensions that match their intended use in the samples.
- Attempting to significantly enlarge these icons may result in quality degradation due to the nature of raster graphics.
- Icons other than the core icons are located at the following paths:
5. Customization
5-1. Resizable 9-Patch Sprites
Overview
- The GUI assets of LayerLab are mostly designed with 9-patch in mind.
- 9-patch sprites can be resized flexibly to fit your project's needs without losing quality. They are divided into nine sections, allowing specific areas of the image to stretch while maintaining the integrity of the corners, making them ideal for various UI layouts.
- Tip: Use the Rect Tool (Shortcut: T) to resize on the canvas, or edit Width and Height values in the Inspector.
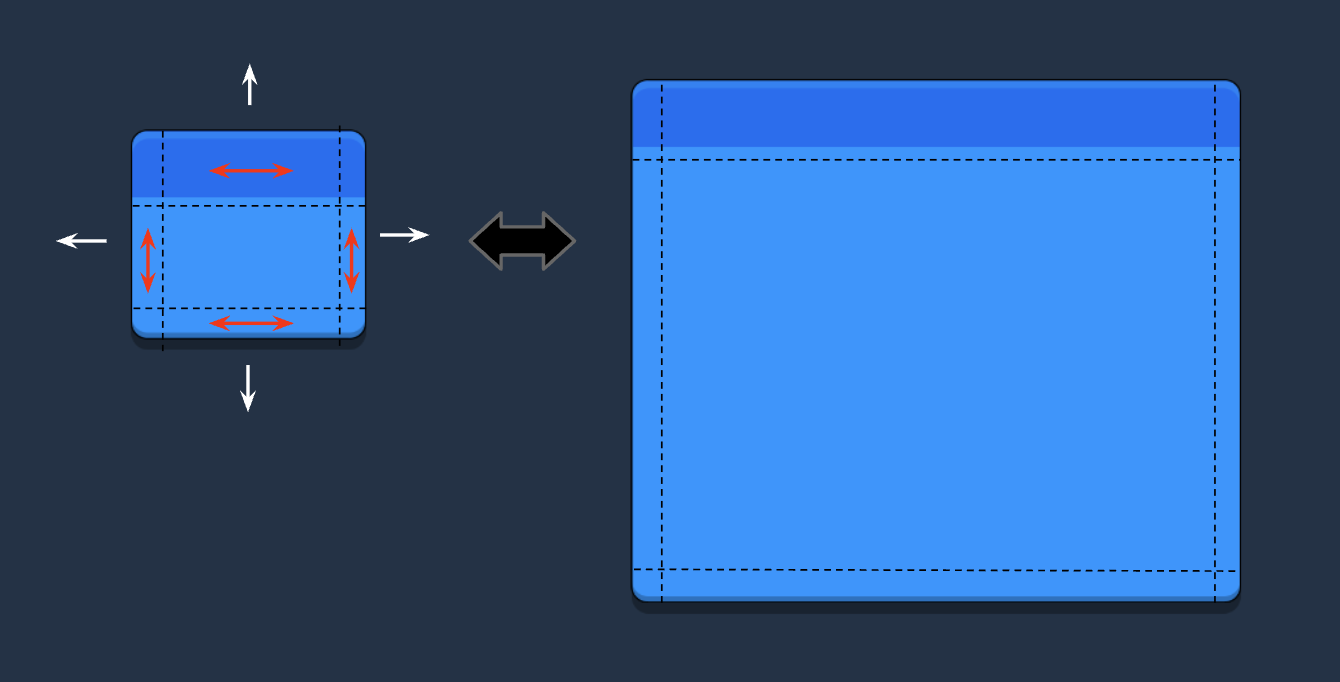
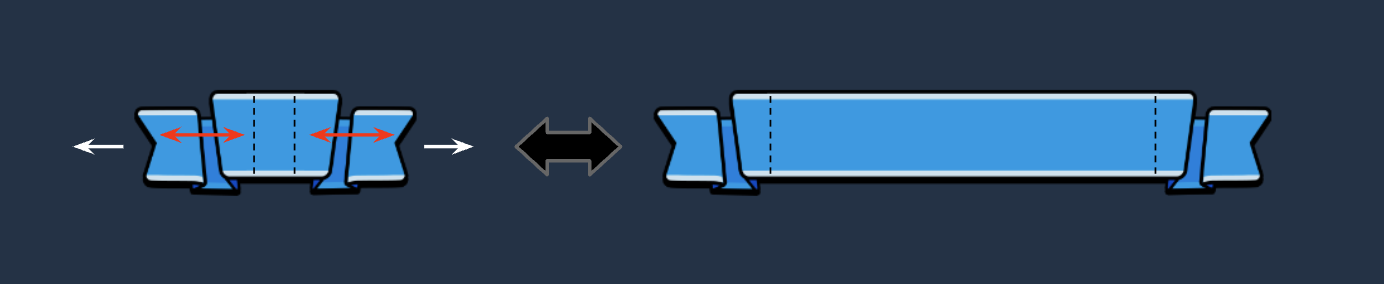
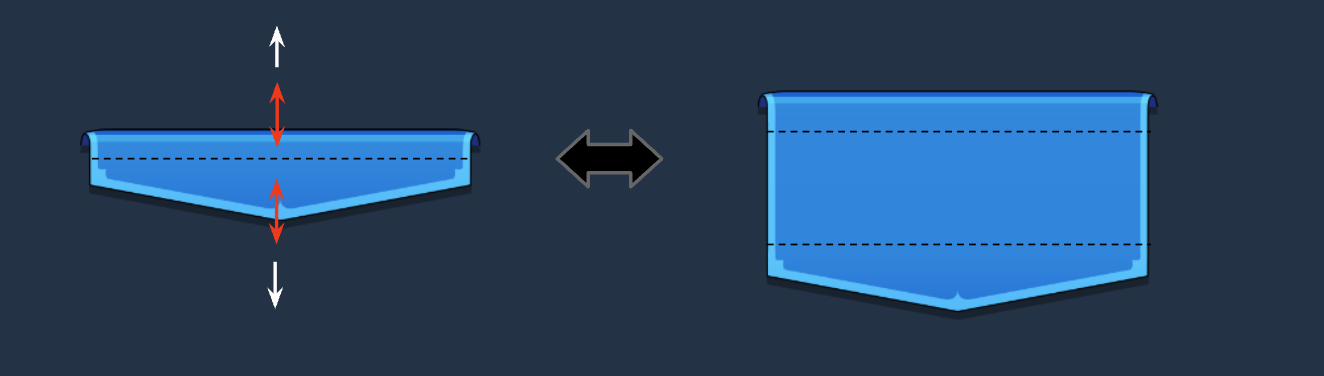
Horizontal and Vertical Limitations
- 9-patch sprites divide the image into nine pieces, allowing size expansion based on the border values of each piece. Therefore, depending on the design of each corner, resizing may only be possible horizontally or vertically.
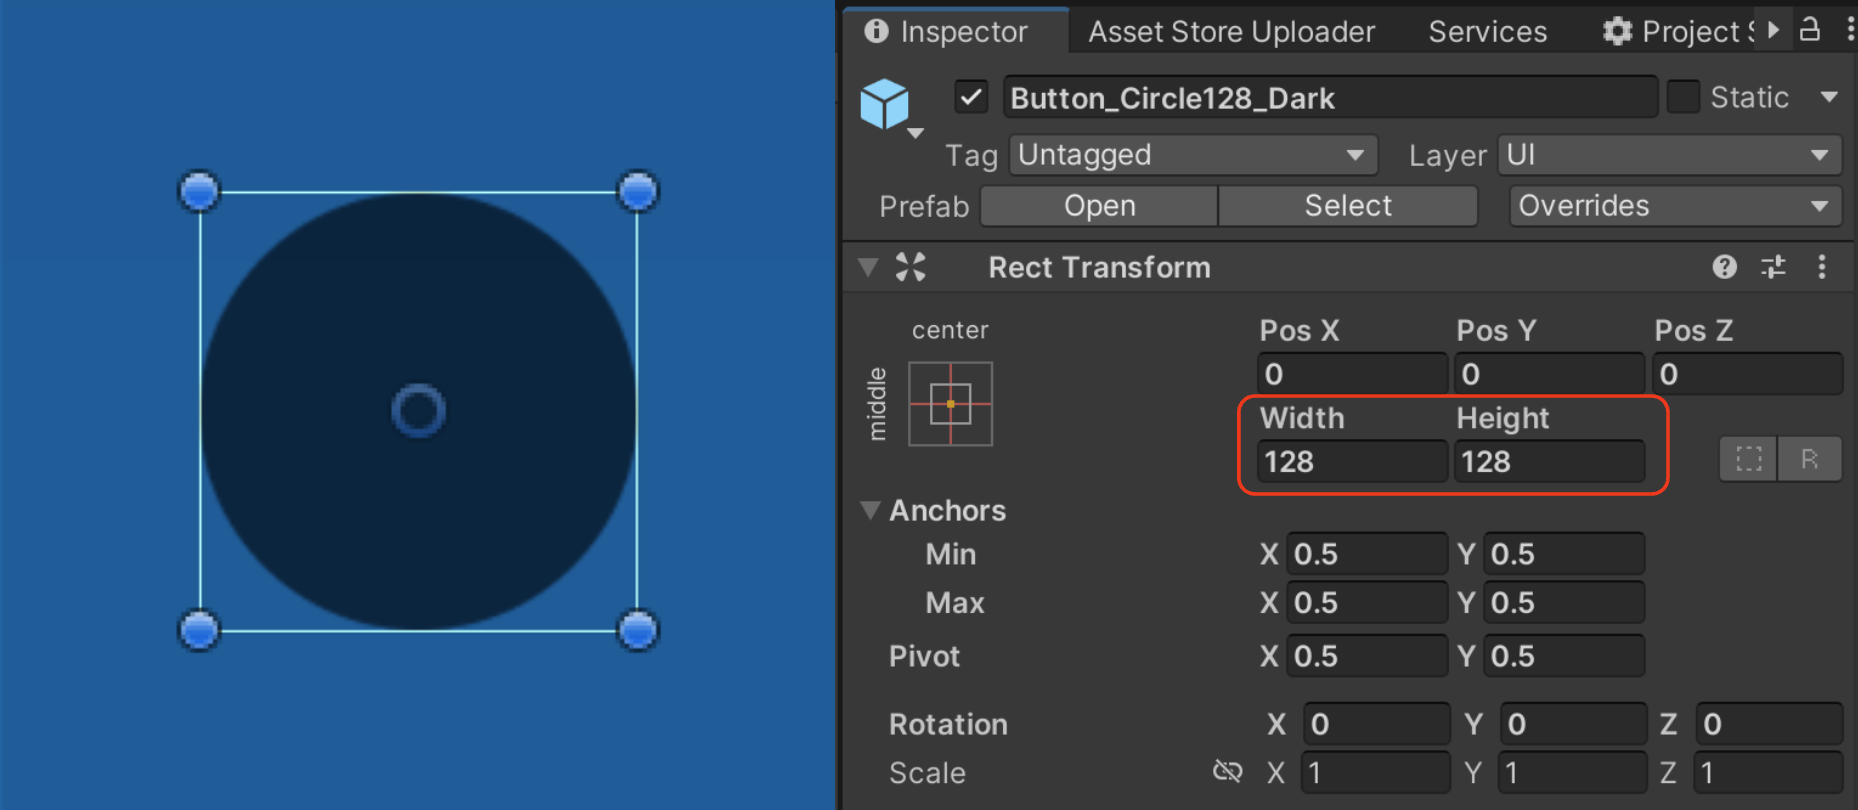
Shape Limitations
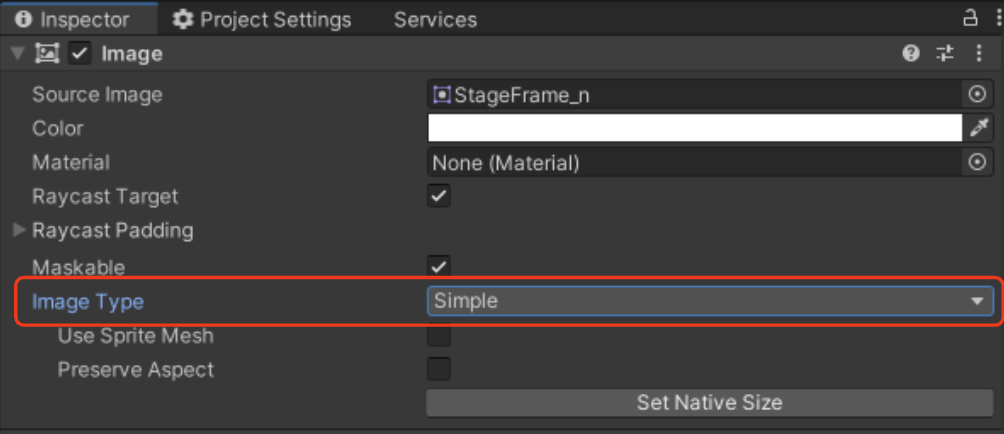
- Circular or hexagonal shapes cannot be divided into 9 sections and are not compatible with 9-slice scaling.
- For these shapes, set the Image Type to 'Simple' and adjust the size manually.
- As with all raster images, scaling beyond 2x the original size may result in quality loss, especially if the source PNG is small.
- Tip: To maintain aspect ratio, use the Scale tool (Shortcut: R) to resize directly on the canvas, or modify the Scale values in the Inspector.


reference video
*[video omitted: %E1%84%92%E1%85%AA%E1%84%86%E1%85%A7%E1%86%AB_%E1%84%80%E1%85%B5%E1%84%85%E1%85%A9%E1%86%A8_2024-11-05_%E1%84%8B%E1%85%A9%E1%84%92%E1%85%AE_6.09.39.mov]*
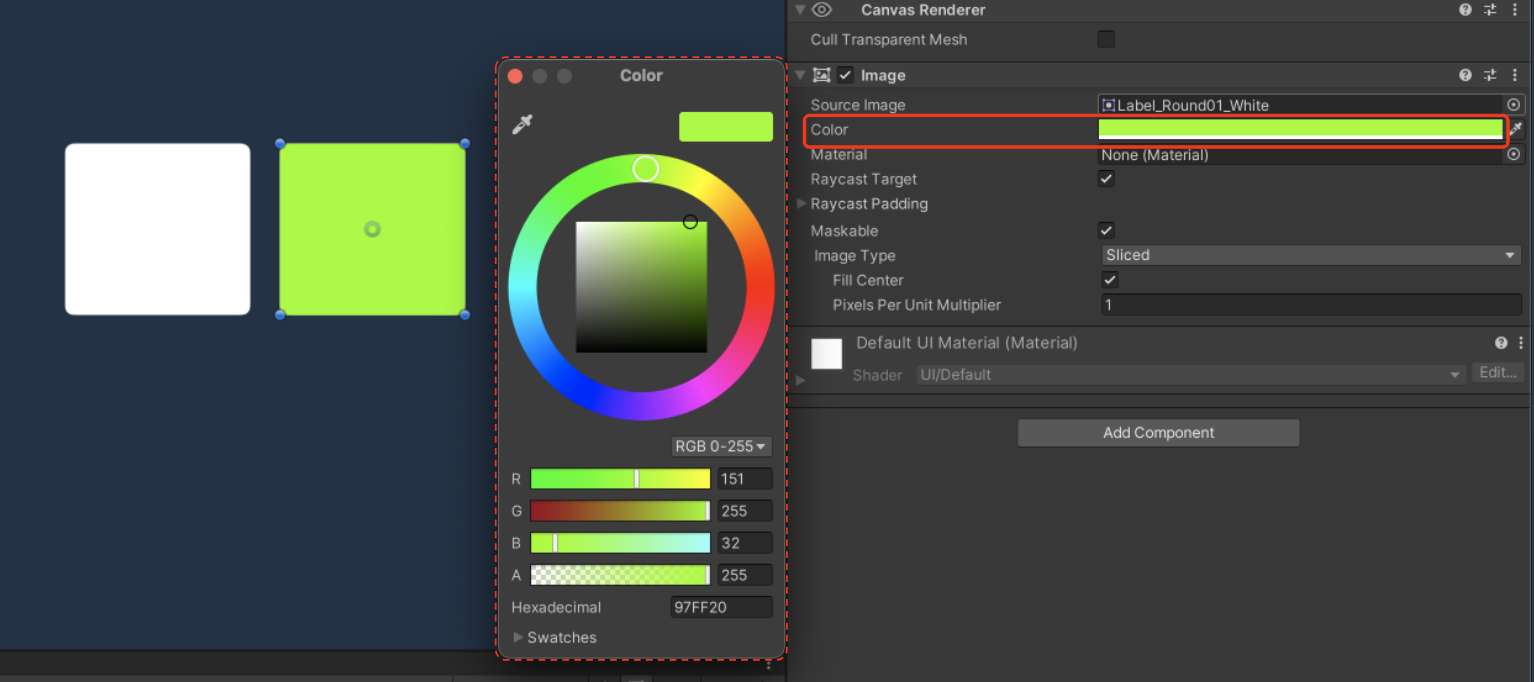
5-2. Color Change with White Sprites
- White sprites can be customized in color to fit the style of your project. This flexibility allows you to adjust the color palette, creating a harmonious atmosphere throughout your user interface.
> 💡
- Each asset pack varies in its support for white sprites.
- Assets released after 2022 support white sprites, while older assets released before that only have sprites with fixed, designated colors.
- Sprites with Fixed Colors That Cannot Be Customized
- White Sprites
- How to Change Colors
reference video
*[video omitted: 11.mov]*
6. Texts
6-1. Font Information
- The sample text used in assest does not support all languages and provides only English by default.
- We have used free fonts as sample assets for the demo scenes and layouts in our GUI assets. However, please exercise caution when using these sample fonts in your projects.
> 💡
Important Note on Font Usage:
Each pack's txt guide includes the source and license links for the fonts used in TextMeshPro. It is crucial for users to verify and comply with the font copyright terms before implementing the fonts in their projects.
Always ensure that you have the necessary rights or permissions to use a font commercially.
Remember: Proper font licensing is an essential part of ethical game development and can help you avoid potential legal issues in the future.
⚠️ As a company selling design assets, LayerLab does not assume legal responsibility for any issues arising from the use of fonts included as samples in its GUI assets.
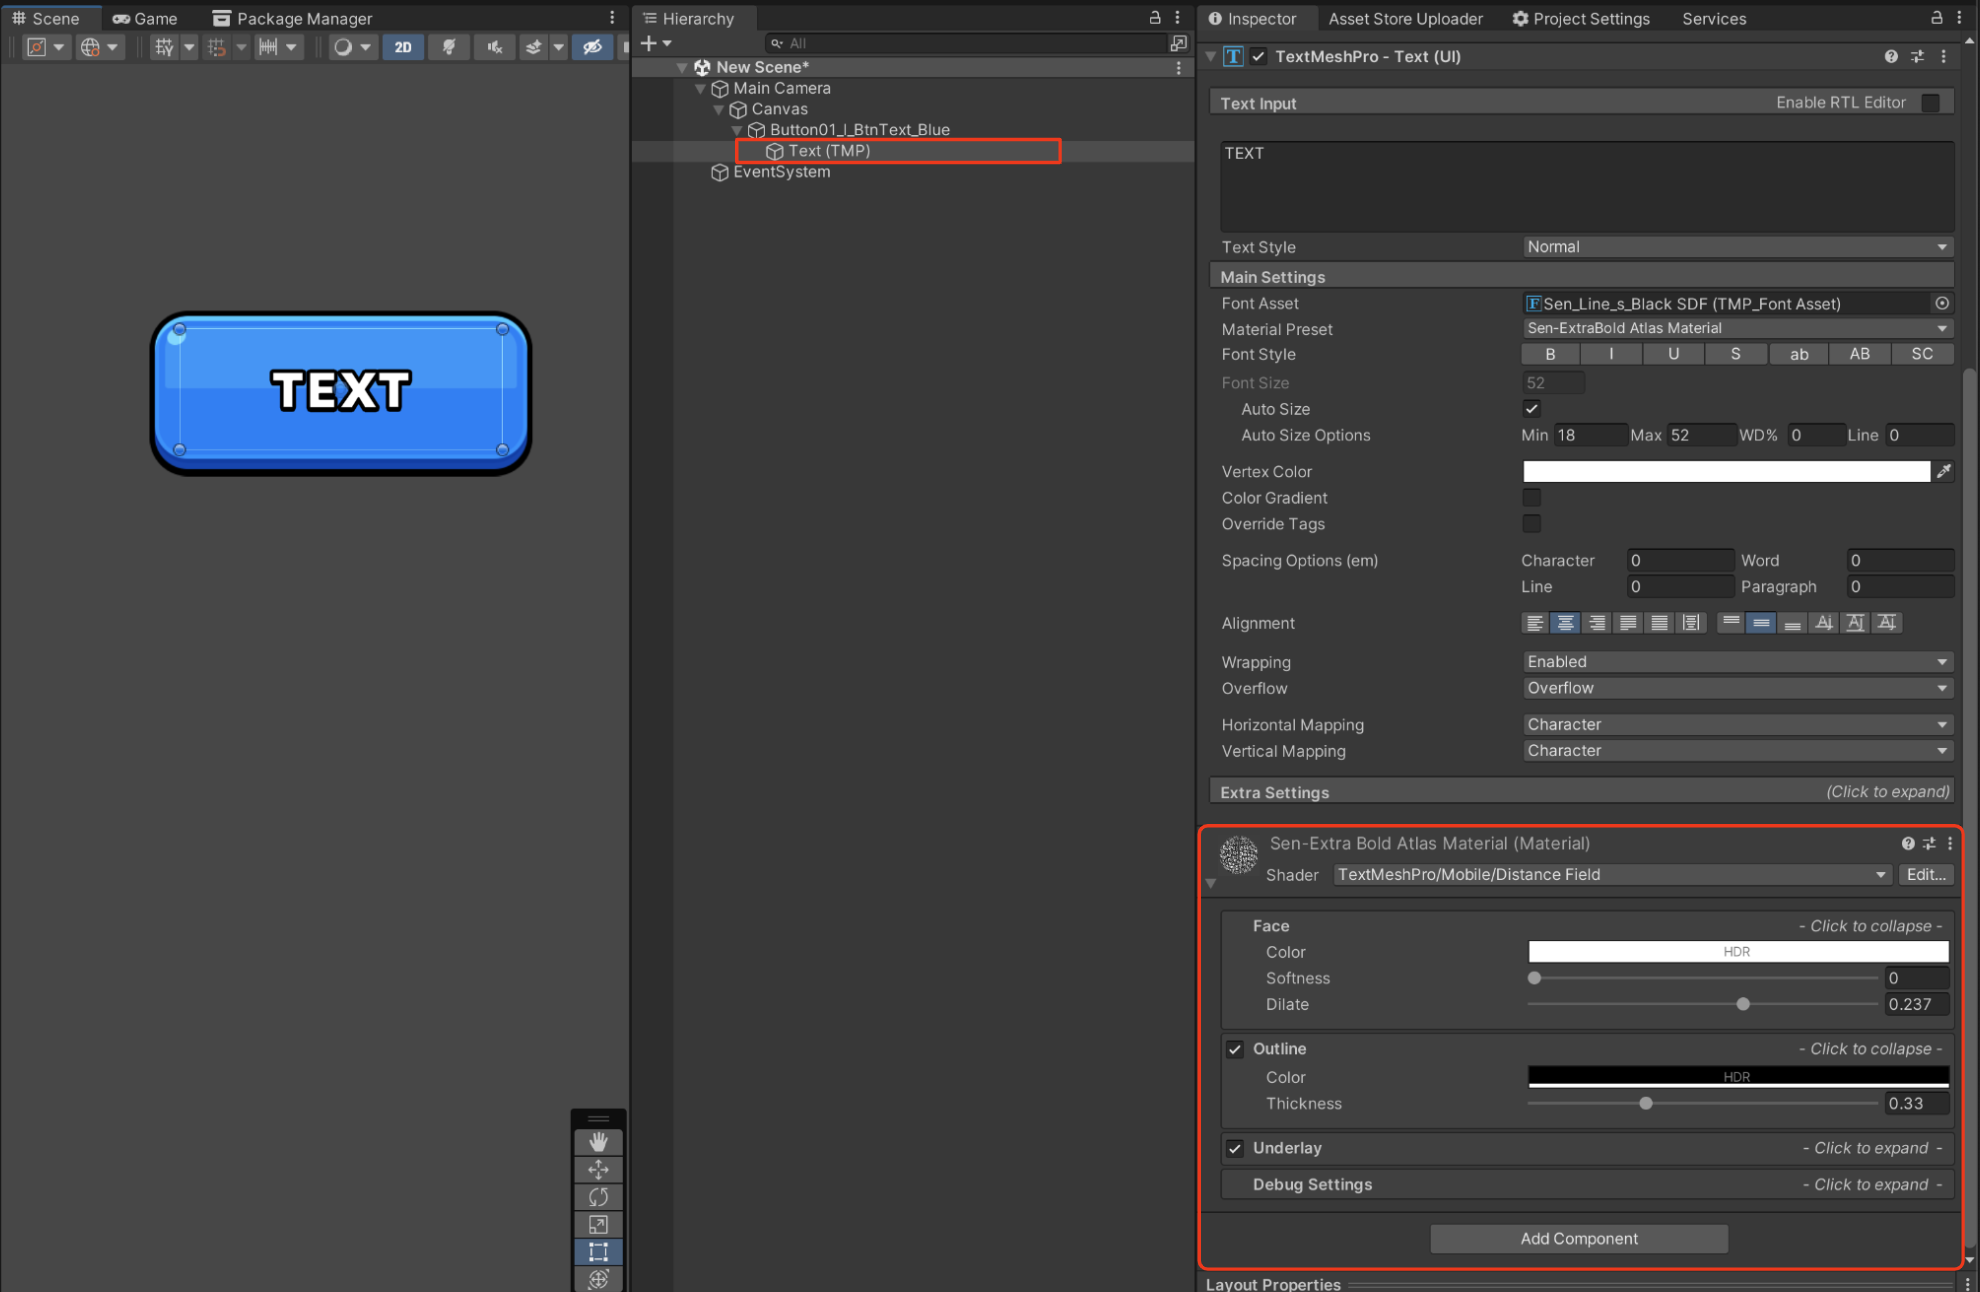
6-2. Text Mesh Pro
- TextMeshPro for text rendering, enhancing the overall visual quality and performance of the UI.
- You can select the text object and adjust detailed design elements such as outline and shadow in the inspector.
- The preview images were created in Photoshop. Photoshop is an image-specialized engine tool that allows for intricate designs.
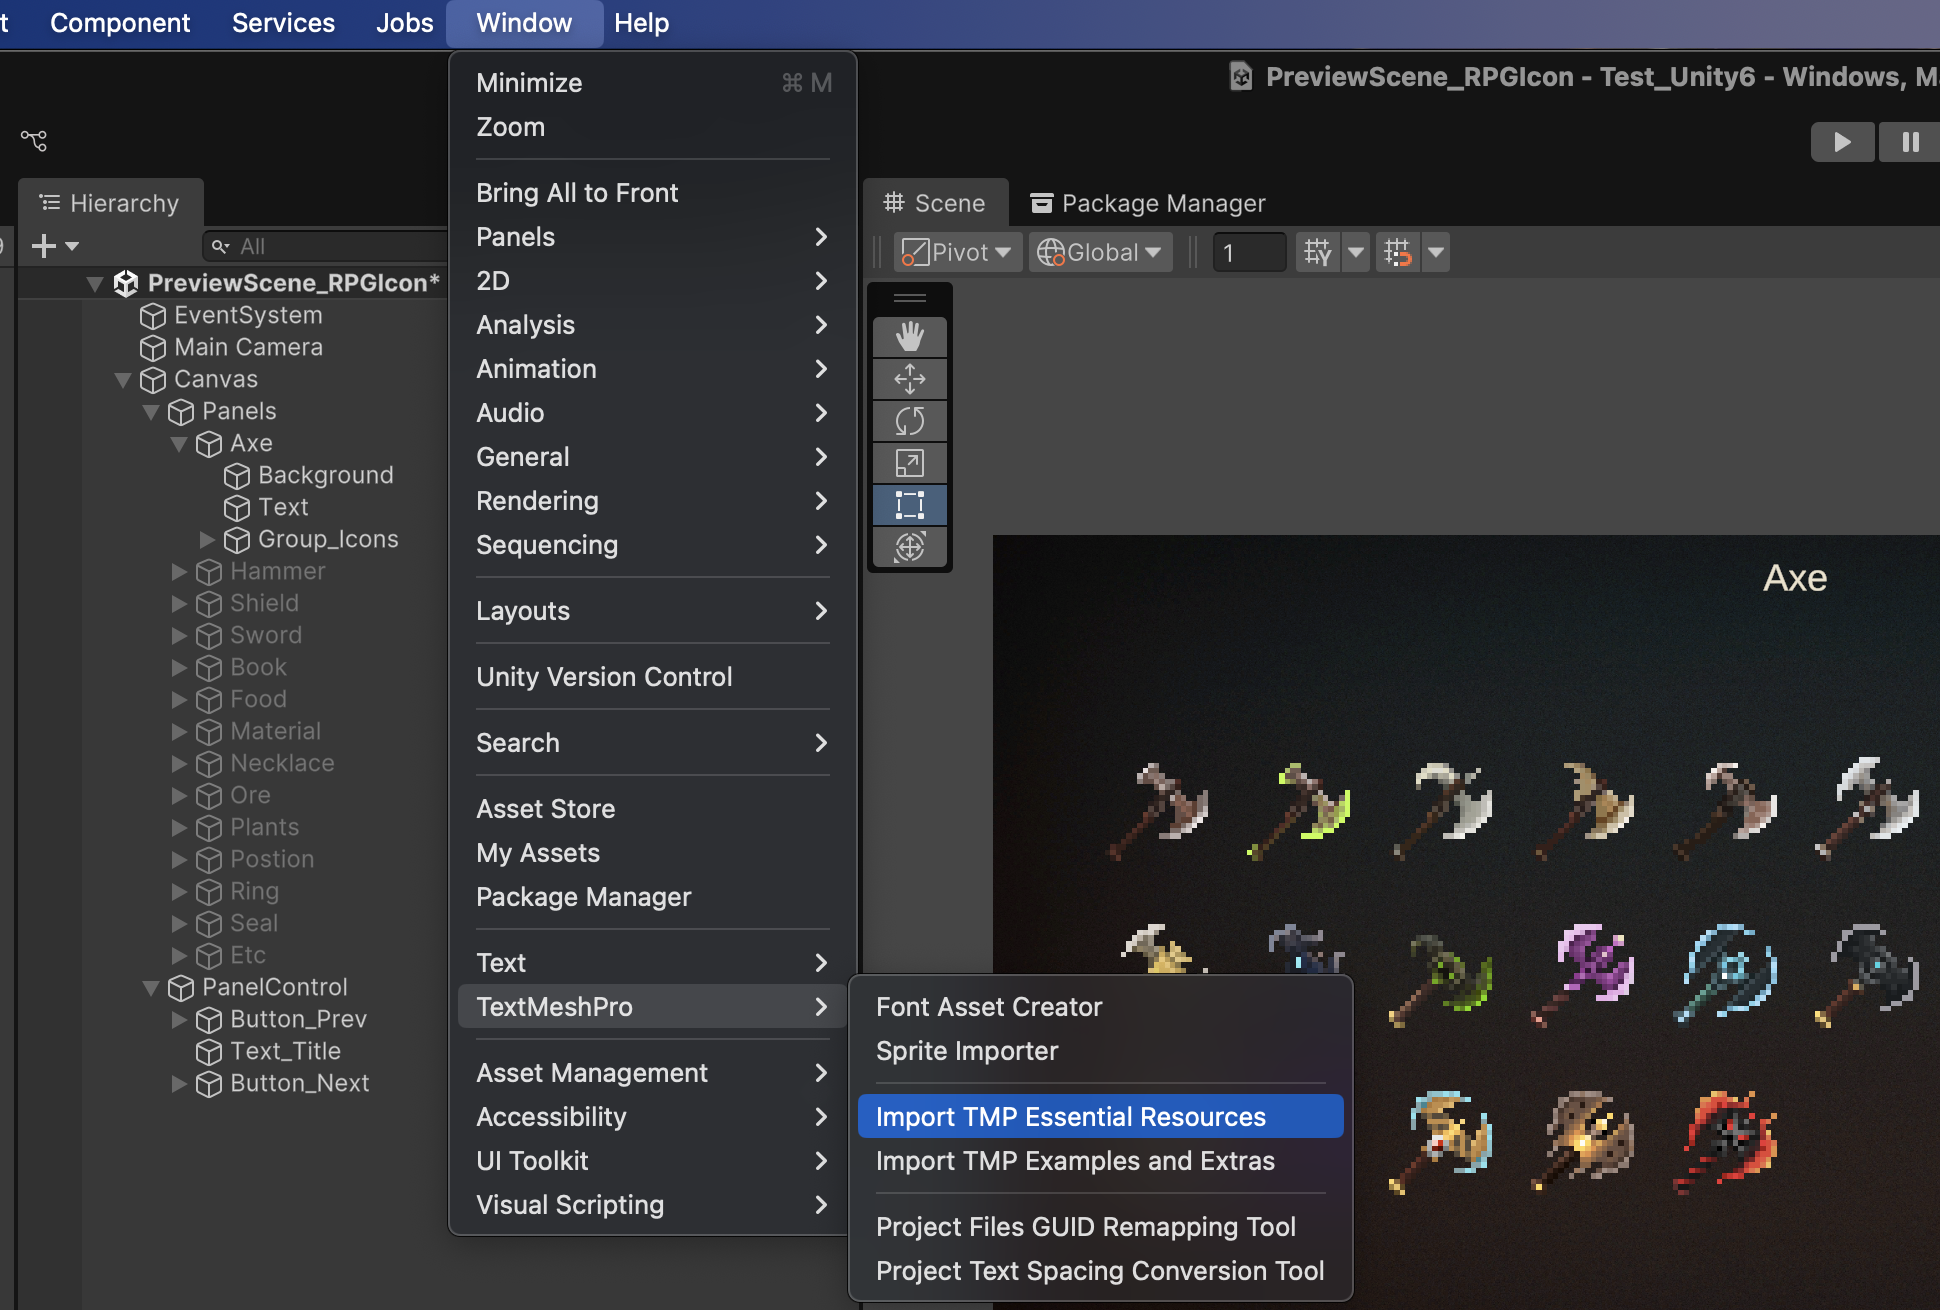
6-3. How to Import TMP Resources
> If TextMeshPro is not installed properly after importing assets:
1. Go to Window > TextMeshPro > Import TMP Essential Resources in the Unity menu.
2. Select and import all the resources again.
>

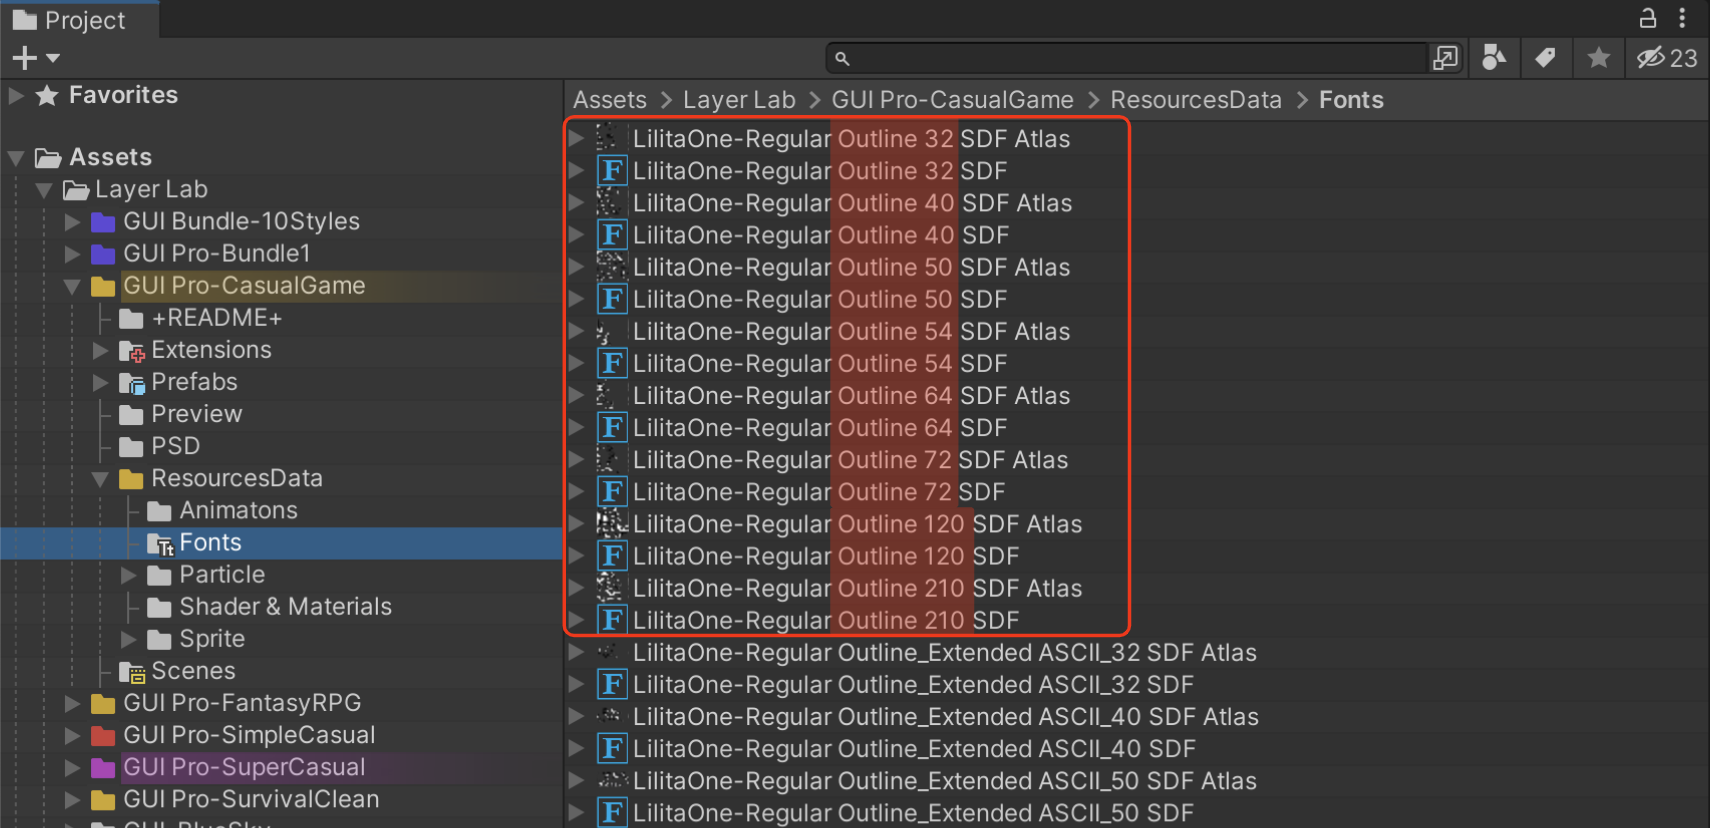
6-4. Outline Bitmap Sample Texts
- Some GUI asset demo tiles have outline style that use bitmap TextMeshPro.
- Because these fonts are generated as bitmaps, the quality may degrade as the text size increases. Therefore, we provide them in various sizes.
- The numbers following the font names (32, 40, 50, 54, 64, 72, 120, 210) indicate the font size. Fonts with the same name contain identical alphabets and symbols, differing only in size.
- Choosing a font size similar to the text you are working with can help prevent image quality degradation.
7. How UI Atlases Handle Texture Sizes
> For your project, we recommend combining individual UI image resources into a single atlas image.
>
>
> The atlas image size becomes a power of two (1024×1024, 2048×2048, 4096×4096).
>
> This helps reduce the build size and improve rendering performance.
>
Unity Official Sprite Atlas Guide
Sprite Atlas Overview
Unity's Sprite Atlas is an asset that combines multiple individual textures (sprites) into a single large texture. This reduces multiple draw calls to just one, optimizing both build size and rendering performance.
✅ Official Link : https://docs.unity3d.com/2021.3/Documentation/Manual/class-SpriteAtlas.html
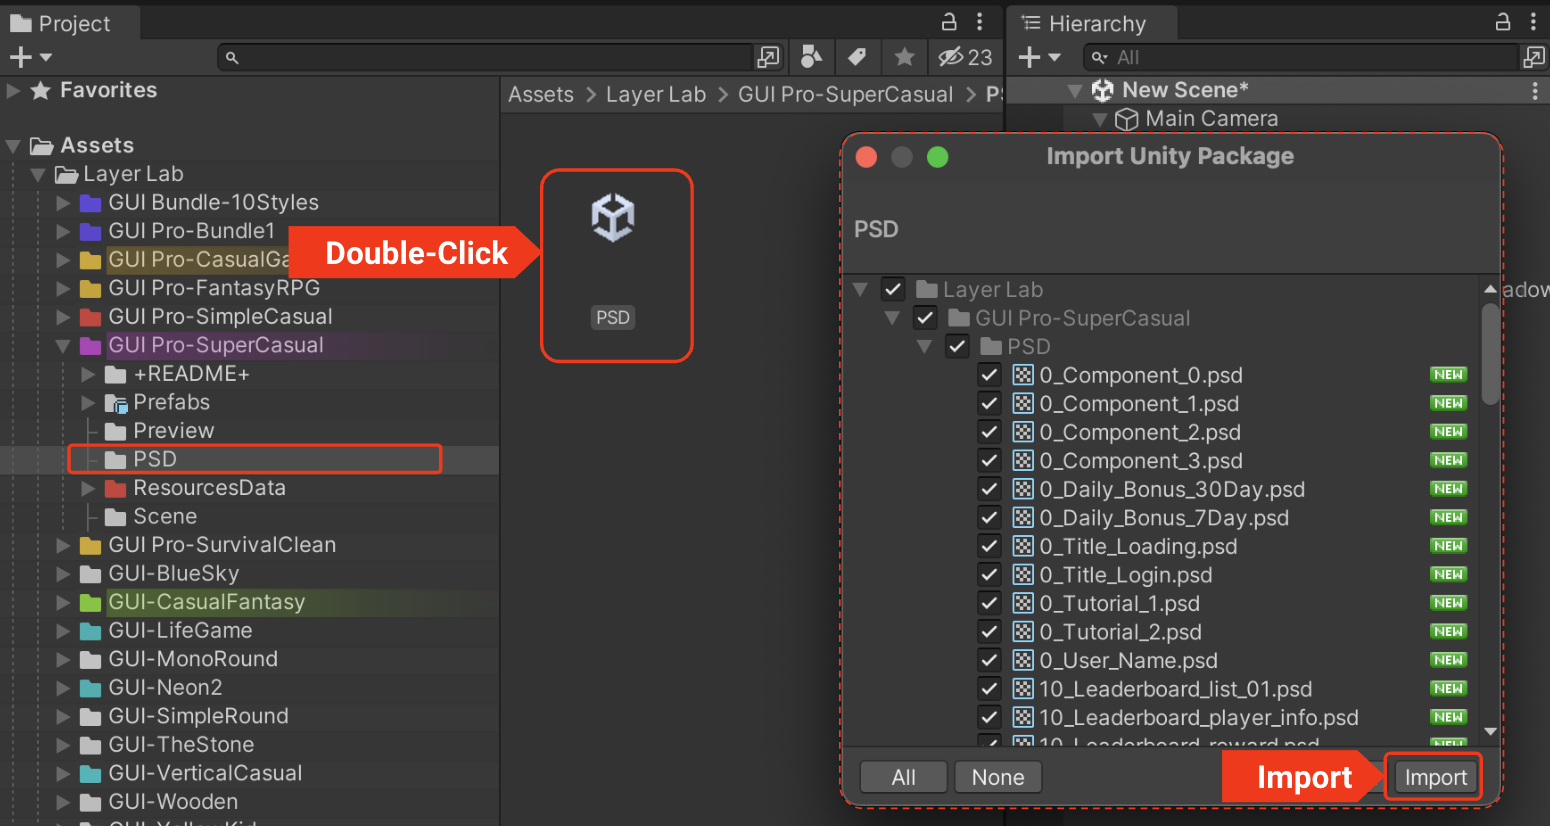
● (+PSD) Pack User Guide
- Identification
- Packaging for Speed
- Importing Files
Important Note:
Support for PSD files is exclusively available to customers who have purchased the (+PSD) pack. If you purchased a standard pack without PSD, these files are not included. Please verify your purchase to ensure you have access to the correct resources.
- Some GUI asset demo tiles have outline style that use bitmap TextMeshPro.
- Because these fonts are generated as bitmaps, the quality may degrade as the text size increases. Therefore, we provide them in various sizes.
- The numbers following the font names (32, 40, 50, 54, 64, 72, 120, 210) indicate the font size. Fonts with the same name contain identical alphabets and symbols, differing only in size.
- Choosing a font size similar to the text you are working with can help prevent image quality degradation.
⬆️ Back to Top